Monday, December 30, 2013

Infinity Scarves!


Happy Holidays!


Infinity scarves are the new winter fashion trend! These 100% wool patchwork scarves are sure to keep you fashionable and cozy all winter long. Each scarf is unique, made with different patterns and designs. The scarves can be worn with a winter jacket or added to a cozy sweater to keep you stylish and warm while walking in a winter wonderland!


Tuesday, July 16, 2013

Flip Flop Wreath Tutorial DIY


~ Flip Flop Wreath Tutorial ~


What better way to celebrate summer then making a bright flip flop wreath? Add shells, beads, buttons or any decoration to make your wreath truly unique!


You will also need about 8 toothpicks

We used Elmer's Craft Bond Rubber Cement for 
the flip flops and Loctite Super Glue Professional Liquid for the gems.
(click photo to enlarge)


 Step 1


Step 2


Step 3


Step 4


Step 5


Step 6


Step 7
This is key to your wreath's survival in the hot weather. 
Trust me, we've tried without the toothpicks 
and the glue just melted off! (not pretty!) 


Step 8
Once completely dry, flip over and repeat with the 
toothpicks ends on the back


Step 9
We used Loctite Super Glue (be careful because it glues your fingers together! :)


...until you've finished!


Step 10
Let dry overnight


Hang your summery wreath on your front porch, by the pool, on your door.

Happy Summer!


Tuesday, July 9, 2013

Summer Flip-Flop Wreath DIY

Do you have a bunch of extra flip flops laying around? Or have you hit to a flip flop sale recently? Well, here a is a cool summer craft idea to put those flops to use. A summer flip-flop wreath!!  You can hang this on your front door, on your house, or by your pool.
You can use as many flip flops as you like in a variety of colors and sizes. We hot glued the flops together (but they sorta fell off and then we used rubber cement glue - a life saver!). We added decorative sea shells and a summery flower in the middle!

Tutorial to come!


Yeah!! Summer! :)

Tuesday, June 25, 2013

Star Earrings


"Shoot for the moon and if you miss you'll land among the stars."


These earrings are perfect for the 4th of July or any day your feeling like a star!

Saturday, April 20, 2013

Cute Summer DIY


DIY!
Summer is just around the corner (sort of) and you want to look cute for the beach or a summer party.
I know you have sooo many old t-shirts you probably don't even realize it. Now you can use them for some fun t-shirt restoration! (and guess what?? Its no sew!)

Supplies:
- t-shirts (preferably ones that are too big for you) - any color (neon is great for summer)
- fabric scissors
- plastic beads (for beaded shirt only)

Here are 3 cute t-shirts you can make:
1. Beaded fringe bottom
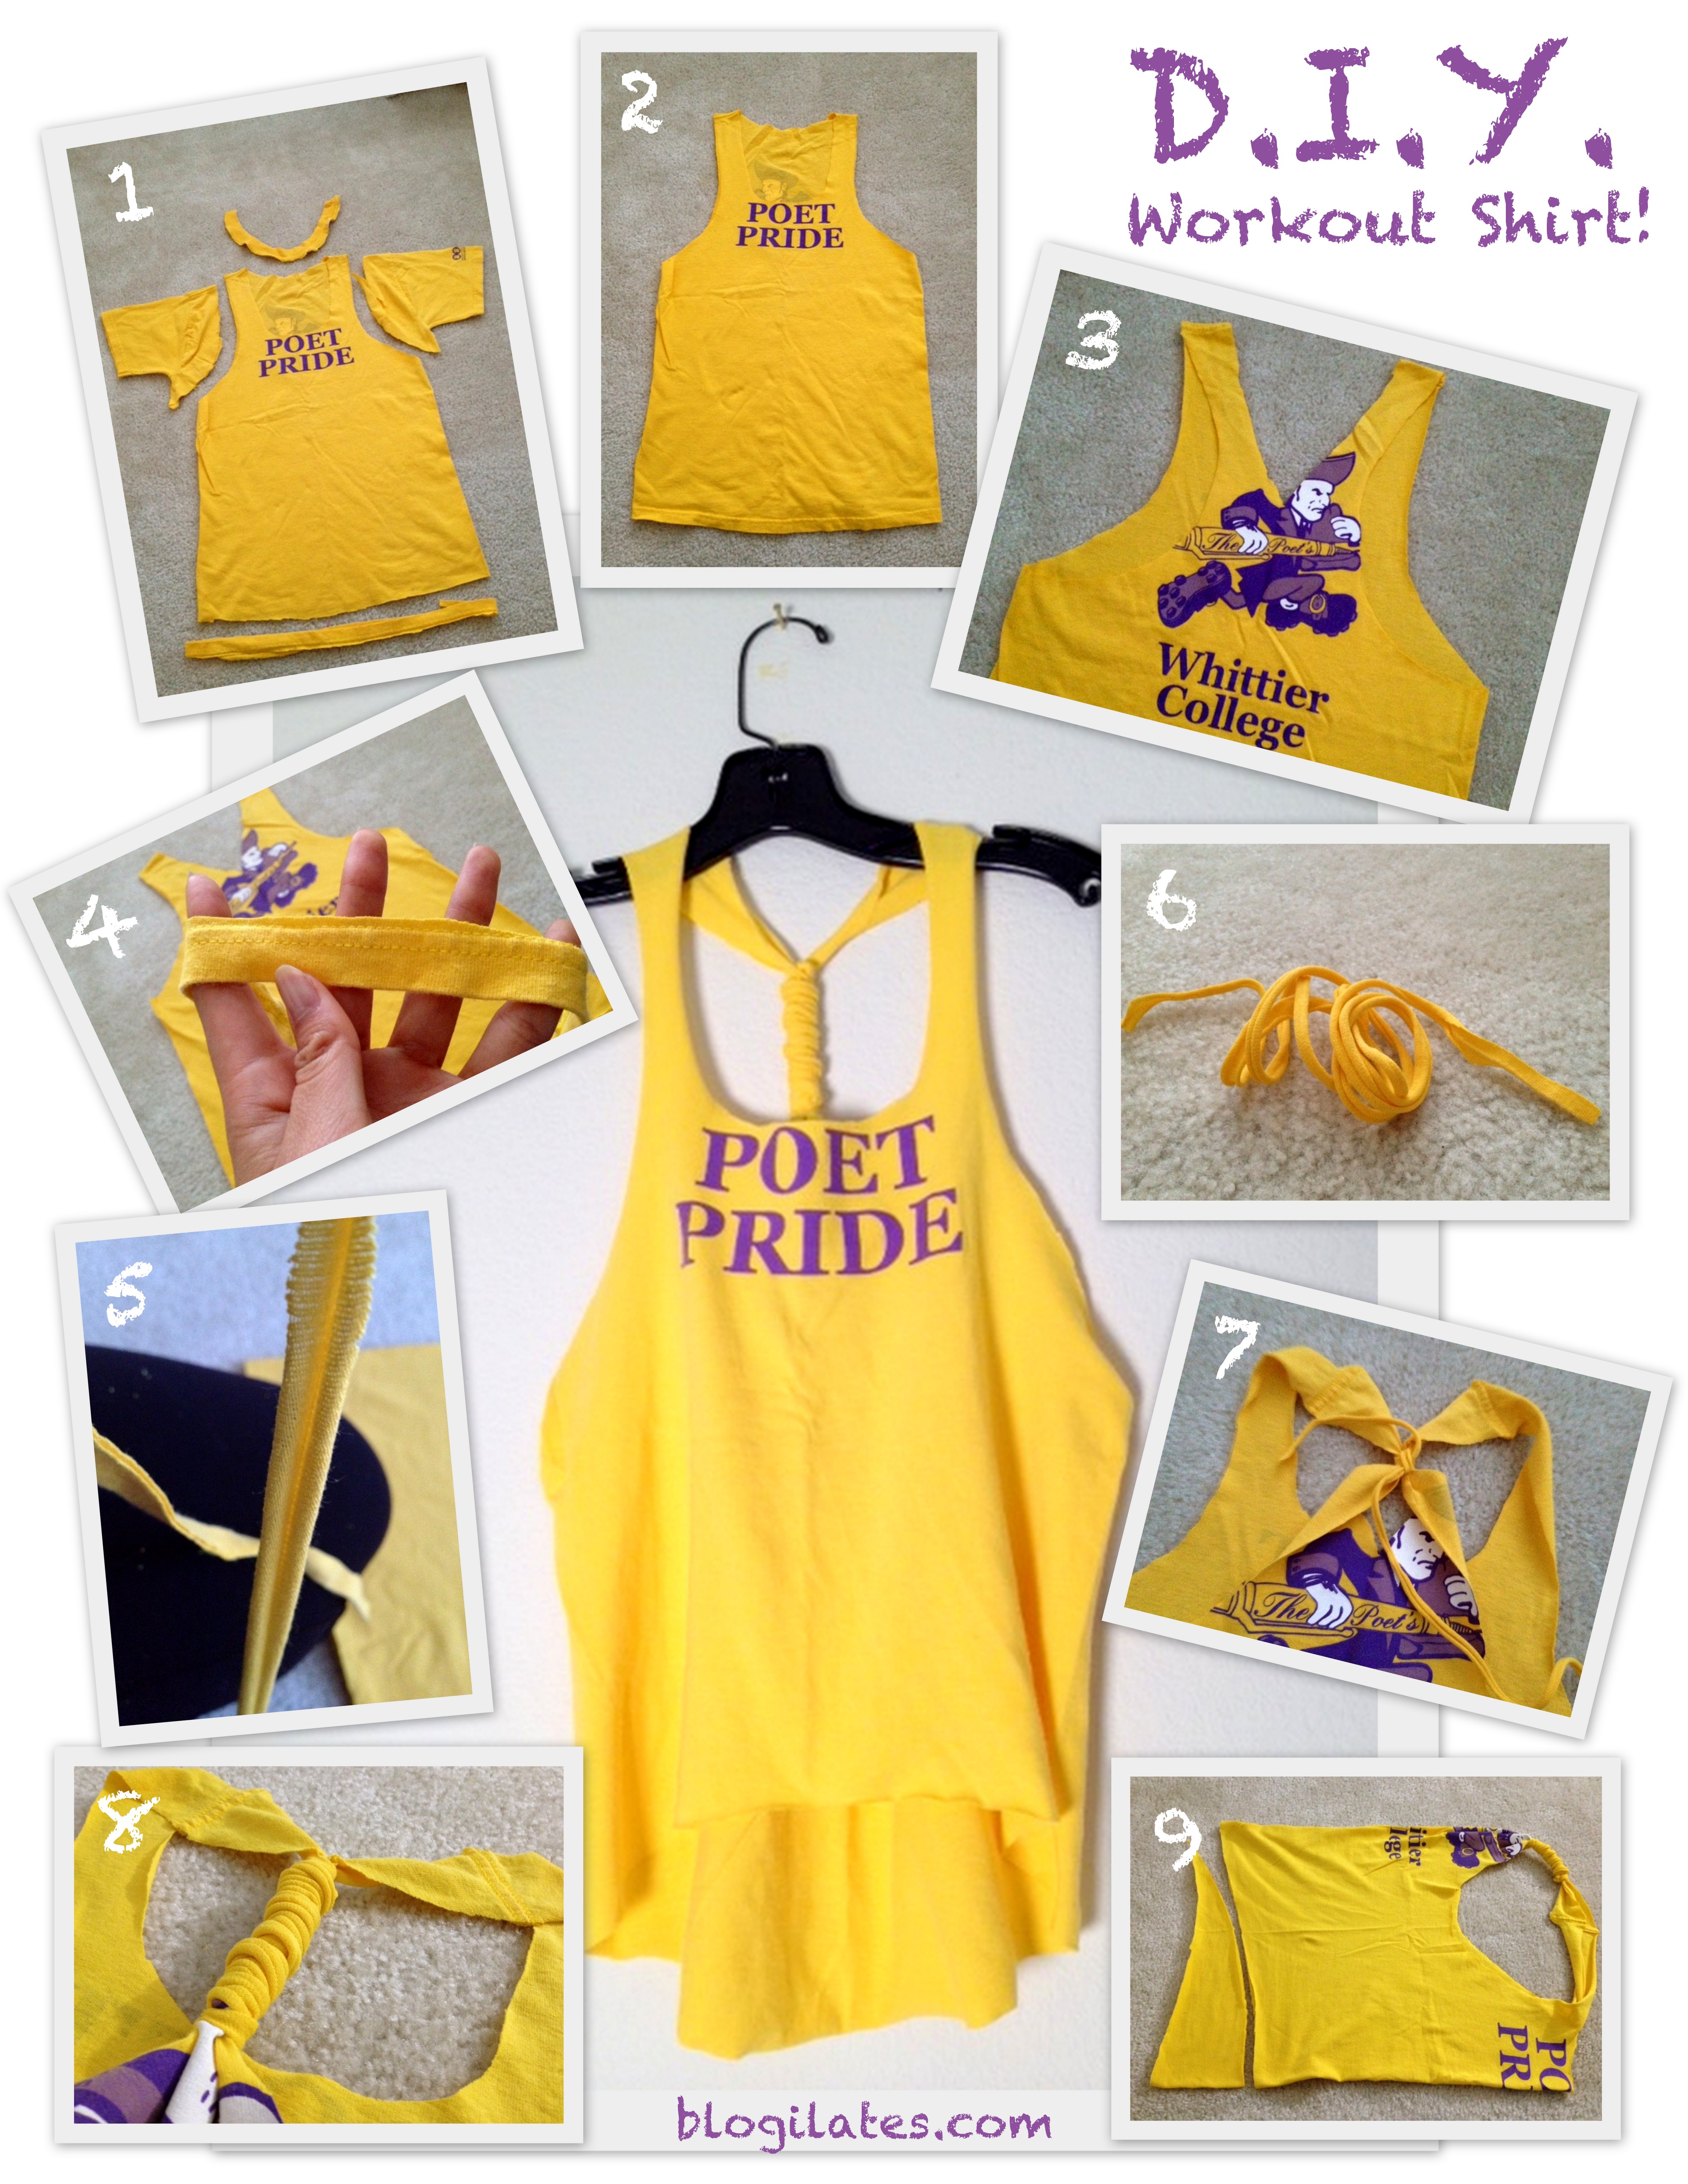
2. Workout style
3. Crop top

1. Beaded Fringe bottom:

Instructions:
1. Lay the t-shirt on a flat surface (floor, table...)
2. Using the fabric scissors, cut the bottom hem off the shirt (go all the way around)
3. Cut strips of the shirt about 1/2 inch to an inch in width and up about 5 or 6 inches all the way around the shirt. You can do this by cutting both layers of the shirt at the same time. (You can also make the shirt shorter by cutting a few inches above the hem)
4. String beads in any color or pattern you want on the strips. I wound recommend 3 or 4 beads per strip because it does take a while! Then tie the strip in a knot at the bottom to secure the beads. Bead all the way around the shirt. You can skip strips in between or bead all of them.
5. Wear it! - over a bathing suit, to the beach, with cute white shorts... The possibilities are endless and you'll be as bright as a star!


2. Workout Shirt


Instructions:
1. Lay the shirt on a flat surface. (the floor is best)
2. Cut away the crew neck the sleeves and the bottom. For the sleeves, you will want to start at the shoulder (you decide how thick you want the strap to be) and cut straight into the chest area. Then curve. If you curve the whole way, it’s gonna look weird on you. Trust me! Try to follow the pictures. (click on it to enlarge)
3. Clean up the edges. Decide how low you want the neckline to be.
4. Turn the shirt to the back and make a narrower racerback.  Then cut a deep V.
5. Take the bottom edge of the shirt that you cut off and cut the seams off so that you’re just left with fabric.
6. Stretch it like a maniac. This is fun.
7. You’re left with a really cool noodle thing. It’s really long too!
8. About 2″ above the bottom of the V tie a know with one edge of the noodle.
9. Wind it round ‘n round, then double knot it at the other end too. Cut off loose ends.
10. To make this a hi-low top, lay your shirt sideways and flat. Then starting at about 4-5″ from the front center of the shirt start diagonally cutting down til you reach the back. You’ll want to cut straight for a bit at the front center then start creating the diagonal or else you’re gonna get a weird arrow shape with you open up.

DONE! Start pulling at the fabric to make rough edges go curly and to make your tank longer.
You can wear this cute workout shirt to the gym or beach with a bright bra or bathing suit underneath.  from Blogilates.com


3. Crop Top

Design 1

Design 2

Instructions:
1. Lay the t-shirt on the floor
2. To make Design 1, cut the neck hem off wide (meaning cut a little lower then the neck hem) and also cut the bottom hem off. You can also cut the sleeve hem off, but it is not necessary. 
3. You can make the shirt hi-low by cutting the front part of the shirt in a crescent moon shape.
4. You can make it cropped by cutting both the front and back sides of the shirt in a crescent moon shape. 
5. Stretch it out to roll the hem and you're done!

To make Design 2: (good for larger shirt)
1. Lay the shirt on a flat surface
2. Cut the sleeves out to the sleeve seam. Also cut the neck hem off. You can cut lower in the front for a V neck or scoop neck.
3. This is the tricky part. You will be cutting some of the back of the shirt off. Refer to the picture below:
Make sure you don't cut the front off! To cut a few inches of the back off, cut up 5 or 6 inches in the side seams and then cut straight across the back of the shirt. So it looks like the first pic in yellow. Then fold the front corners in, to form a triangle. Cut the folds off (so you'll have 2 triangles free and one larger one attached)
4. With the triangle still attached to the front of the shirt, cut up the middle until you reach the height of the back of the shirt (4 or 5 inches up)
5. Put the shirt on and tie the 2 ends in a knot. Tadaaa - a cute tie-in-the-front shirt!

So there you have it  - 3 super fun DIY shirts you can make using an old t-shirt! Please comment below if you have any trouble making any shirt or if you have any tips or suggestions.

Enjoy! :)


Sunday, March 3, 2013

La Fiesta!


Hola!
For the past few days the weather has been freezing, drab and just plain gross. However, I've been working on some fabulously uplifting projects that are bright and colorful! Hopefully this post will cheer (and warm) you up!

Since we're in the season of winter everyone's wearing dull colors - black, grey, brown - there is no color! So I'm going through a phase of making things bright and colorful. I love bright oranges, bold pinks, and sunset yellows. 


My first project is a Kindle/laptop/tablet sleeve. I made it with faux leather (on sale at Joanns!!) and contrasted the lining in a sunset/mustard yellow felt. I blanket-stitched the top using the matching yellow embroidery floss. Embroidering the top gives the sleeve a fancy and elegant touch.


I looove this next piece. I call it "La Fiesta en el Apron." The colors are so rich, it reminds me of a Mexican fiesta! I can imagine mi abuela wearing it... standing at the stove flipping tortillas!


I can't wait for summer! :)


Friday, January 25, 2013

Zipper Wristlets

Exposed Zipper Wristlets!!
 This is a great project to learn how to sew on a zipper, plus the zipper acts as the strap for the wristlet.

Monday, December 24, 2012

Merry Christmas!

Merry Christmas! 

Make this quick hand-sewen Christmas stocking with red and white felt. Trace the felt on a stocking template and hand sew up the sides. Sew the white around the 2 remaining sides and top. Even add a cute holiday button! The holiday jewelry includes a wrapped present, bell, and light earrings, and novelty charm necklaces. 


You could also make this adorable cork reindeer. (perfect gift for the parents) You use 4 corks - a regular one for the body and 3 cut half ones for the arms, legs, and head. (hot glue them to the body) You can decorate the reindeer with stick antlers, a bell or bead for the nose, felt ears and tail, and googily eyes! Tie a ribbon around its neck for an ornament or tie it in a bow to display it standing up.

Happy Holidays!!
xoxo Sewing Club


Saturday, November 17, 2012

Pretty in Pink


This beautiful pink rose jewelry set makes the perfect holiday gift! 
(It will also look fabulous all safely wrapped up in a jewelry roll too!) 

Saturday, October 27, 2012

Yoga Leggings!

Yoga Leggings!

Yoga pants and leggings are everywhere. Seriously, they are a wardrobe essential! Yogas go with practically every outfit - tucked into boots with a cute sweatshirt or just worn with a plain t-shirt and sneakers for a workout. 
Since they are so popular... we thought we should create our own.

This yoga legging is the perfect pant for working out, and wearing out! It is made extra comfy and stylish with a fold over waist band. 
You can also make this pant using a turquoise blue band or with grey jersey fabric.


Who's excited?! 

Sunday, October 14, 2012

Bracelet Tutorial!


Tutorial: Simple Seed Bead Bracelet

This seed bead bracelet is so simple and perfect to wear for any occasion. 
Now lets make one!


What you will need:
- Assorted seed beads
- Silver beading wire
- 2 silver crimp beads
- 1 silver clasp
- 1 silver jump ring
- Wire cutters
- Round nose pliers 
- Ruler


Step 1
Cut 10 inches of beading wire with the wire cutters. (You can also make this a anklet, just cut 12 inches of wire. You'll have extra.)


Step 2
String a crimp bead and then the clasp on one end of the wire


Step 3
Thread the end of the wire through the crimp to form a loop around the ring of the clasp (Step 7)


Step 4
Using the round nose pliers, squeeze the crimp flat


Step 5
Decide on a beading pattern for your bracelet and start beading...

....and keep beading...


and beading...

Until you have reached your desired length (for a bracelet usually 7 inches and for an anklet 10-12 inches)


Step 6
String on a crimp bead and then the jump ring


Step 7
 Make a loop by threading the end of the wire through the crimp bead (Step 3)


Step 8
 Pull the loop tight, making sure all the wire is covered with beads


Step 9
Using the round nose pliers, squeeze the crimp tight, securing the end


Step 10
Trim the remaining wire with the wire cutters and tuck the little end through the previous bead so it doesn't poke you


And tada!  Now you have your very own seed bead bracelet or anklet!!


Wear it proudly and tell everyone you made it!!

first picture from 20-minute crafts beading by ali russ