DIY!
Summer is just around the corner (sort of) and you want to look cute for the beach or a summer party.
I know you have sooo many old t-shirts you probably don't even realize it. Now you can use them for some fun t-shirt restoration! (and guess what?? Its no sew!)
Supplies:
- t-shirts (preferably ones that are too big for you) - any color (neon is great for summer)
- fabric scissors
- plastic beads (for beaded shirt only)
Here are 3 cute t-shirts you can make:
1. Beaded fringe bottom
2. Workout style
3. Crop top
1. Beaded Fringe bottom:

Instructions:
1. Lay the t-shirt on a flat surface (floor, table...)
2. Using the fabric scissors, cut the bottom hem off the shirt (go all the way around)
3. Cut strips of the shirt about 1/2 inch to an inch in width and up about 5 or 6 inches all the way around the shirt. You can do this by cutting both layers of the shirt at the same time. (You can also make the shirt shorter by cutting a few inches above the hem)
4. String beads in any color or pattern you want on the strips. I wound recommend 3 or 4 beads per strip because it does take a while! Then tie the strip in a knot at the bottom to secure the beads. Bead all the way around the shirt. You can skip strips in between or bead all of them.
5. Wear it! - over a bathing suit, to the beach, with cute white shorts... The possibilities are endless and you'll be as bright as a star!
2. Workout Shirt
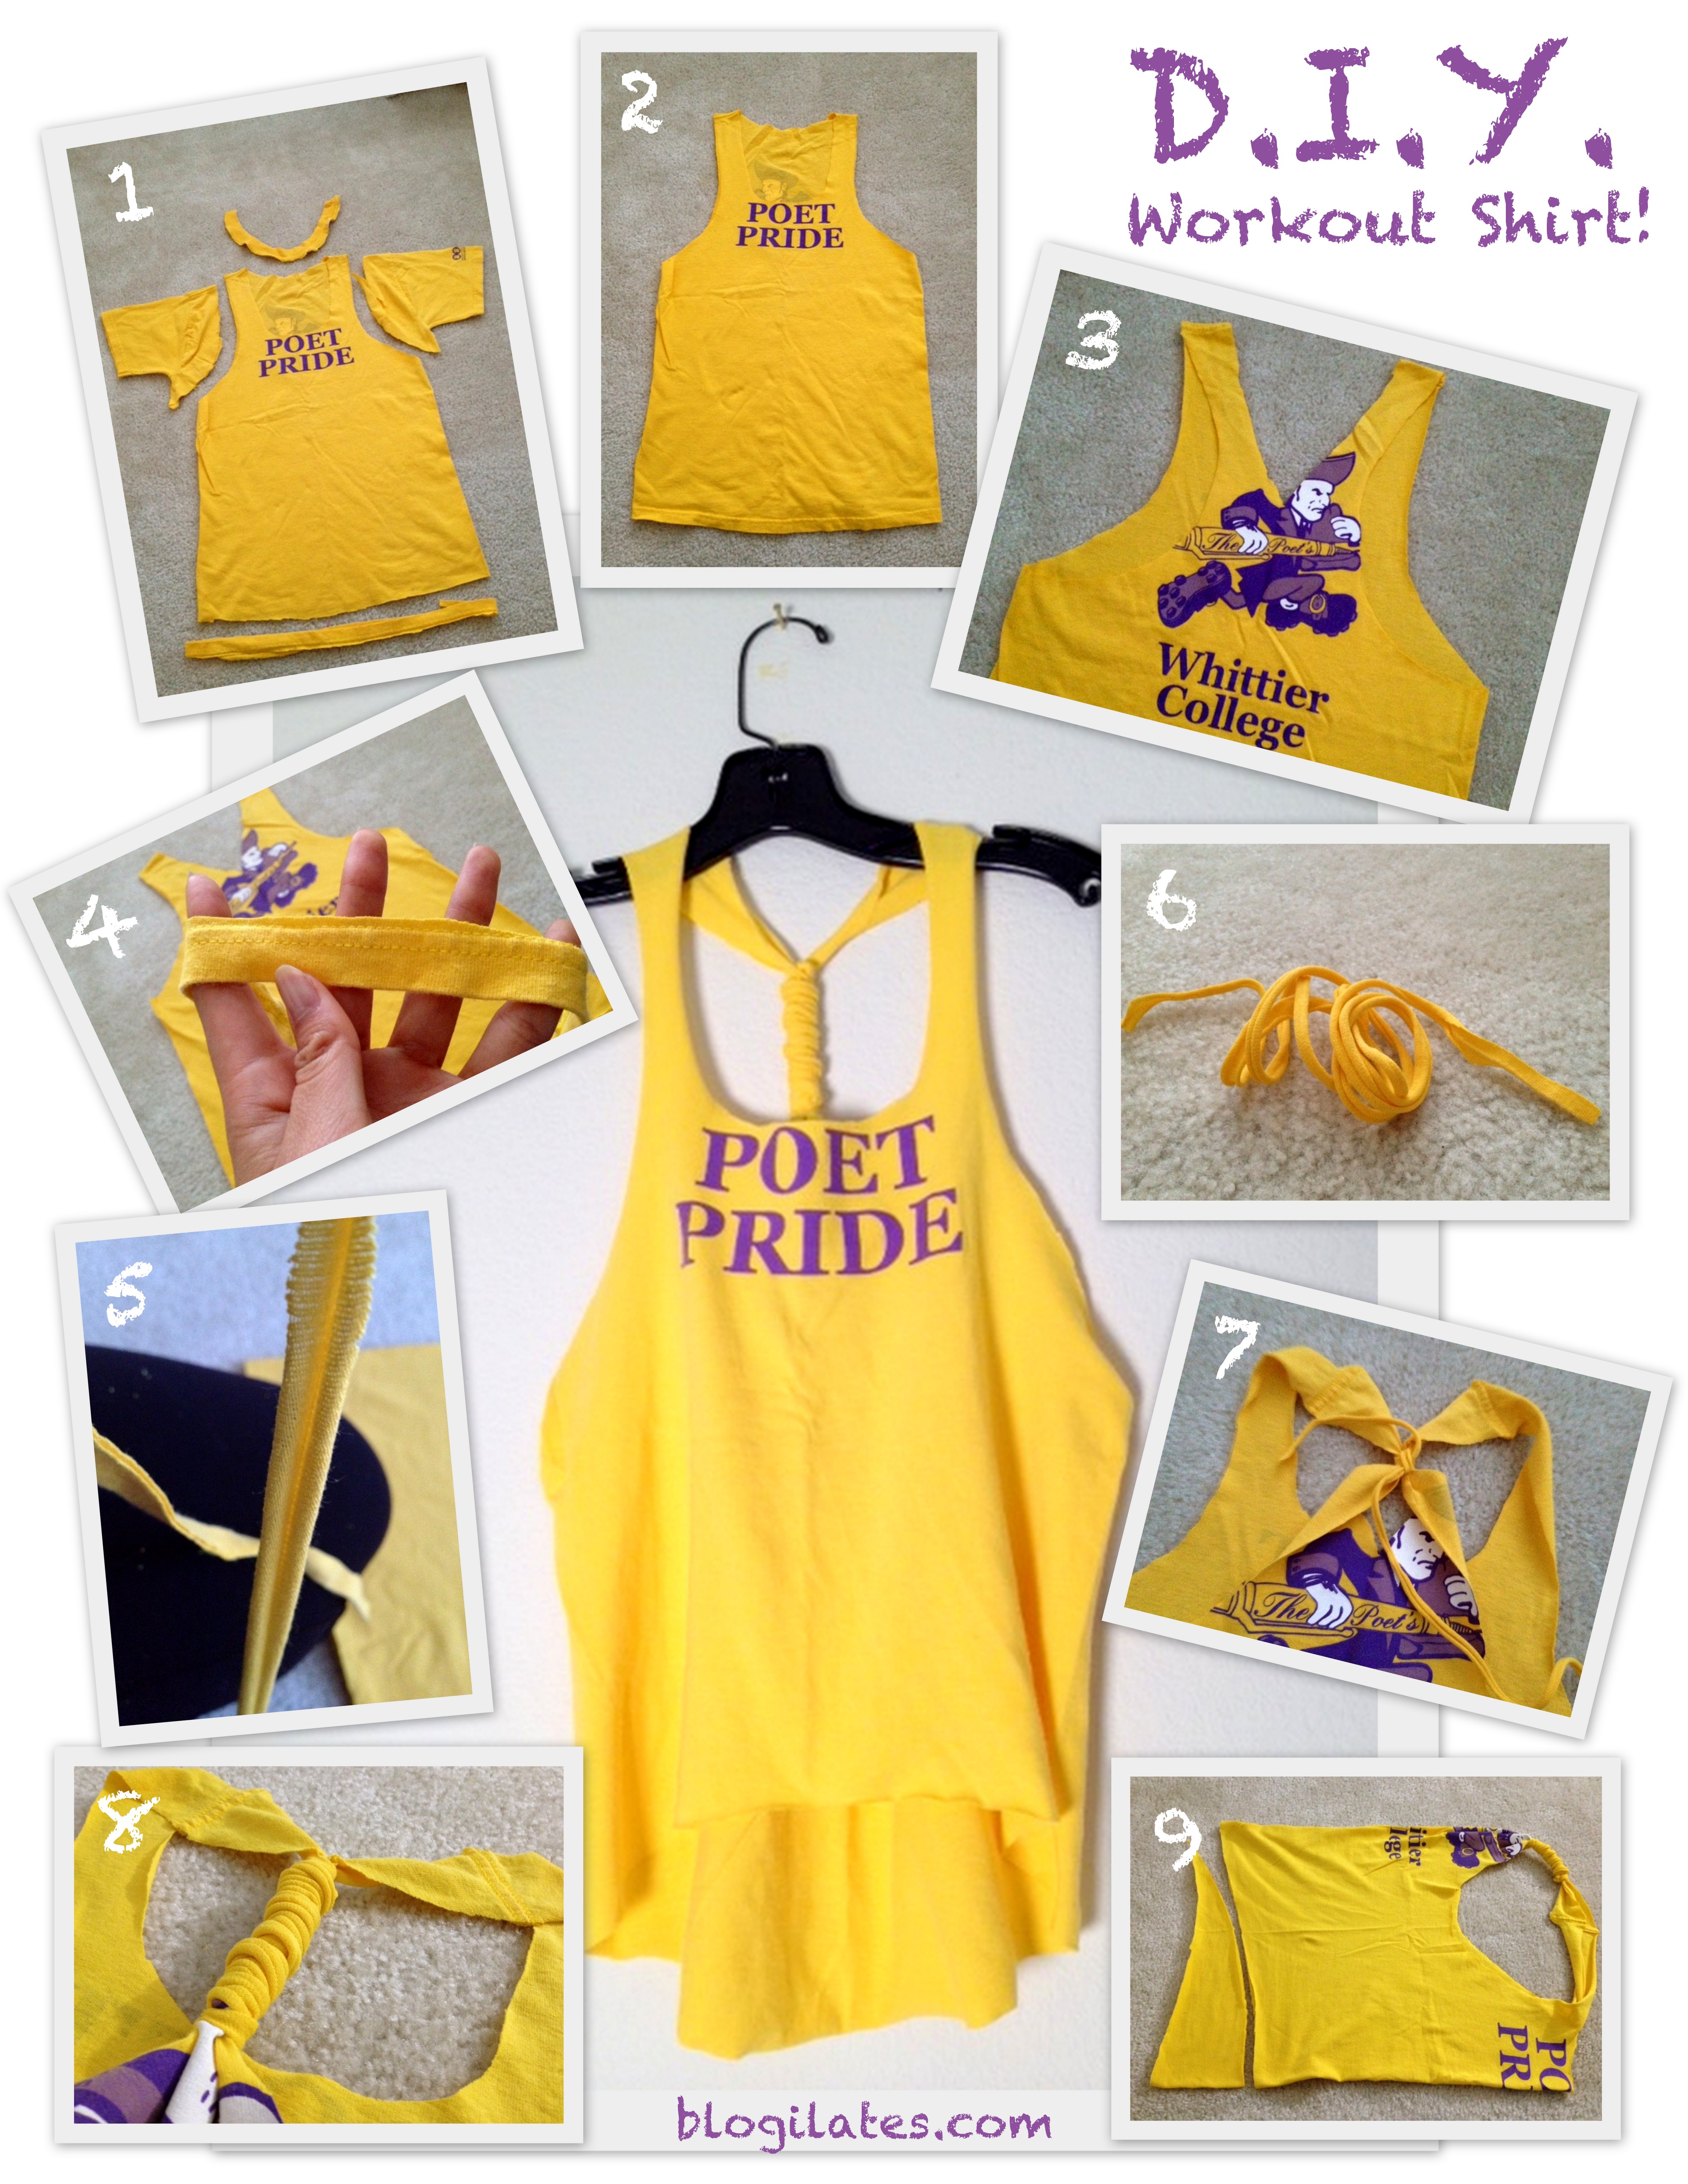
Instructions:
1. Lay the shirt on a flat surface. (the floor is best)2. Cut away the crew neck the sleeves and the bottom. For the sleeves, you will want to start at the shoulder (you decide how thick you want the strap to be) and cut straight into the chest area. Then curve. If you curve the whole way, it’s gonna look weird on you. Trust me! Try to follow the pictures. (click on it to enlarge)
3. Clean up the edges. Decide how low you want the neckline to be.
4. Turn the shirt to the back and make a narrower racerback. Then cut a deep V.
5. Take the bottom edge of the shirt that you cut off and cut the seams off so that you’re just left with fabric.
6. Stretch it like a maniac. This is fun.
7. You’re left with a really cool noodle thing. It’s really long too!
8. About 2″ above the bottom of the V tie a know with one edge of the noodle.
9. Wind it round ‘n round, then double knot it at the other end too. Cut off loose ends.
10. To make this a hi-low top, lay your shirt sideways and flat. Then starting at about 4-5″ from the front center of the shirt start diagonally cutting down til you reach the back. You’ll want to cut straight for a bit at the front center then start creating the diagonal or else you’re gonna get a weird arrow shape with you open up.
DONE! Start pulling at the fabric to make rough edges go curly and to make your tank longer.
You can wear this cute workout shirt to the gym or beach with a bright bra or bathing suit underneath. from Blogilates.com
3. Crop Top

Design 1

Design 2
Instructions:
1. Lay the t-shirt on the floor
2. To make Design 1, cut the neck hem off wide (meaning cut a little lower then the neck hem) and also cut the bottom hem off. You can also cut the sleeve hem off, but it is not necessary.
3. You can make the shirt hi-low by cutting the front part of the shirt in a crescent moon shape.
4. You can make it cropped by cutting both the front and back sides of the shirt in a crescent moon shape.
5. Stretch it out to roll the hem and you're done!
To make Design 2: (good for larger shirt)
1. Lay the shirt on a flat surface
2. Cut the sleeves out to the sleeve seam. Also cut the neck hem off. You can cut lower in the front for a V neck or scoop neck.
3. This is the tricky part. You will be cutting some of the back of the shirt off. Refer to the picture below:

Make sure you don't cut the front off! To cut a few inches of the back off, cut up 5 or 6 inches in the side seams and then cut straight across the back of the shirt. So it looks like the first pic in yellow. Then fold the front corners in, to form a triangle. Cut the folds off (so you'll have 2 triangles free and one larger one attached)
4. With the triangle still attached to the front of the shirt, cut up the middle until you reach the height of the back of the shirt (4 or 5 inches up)
5. Put the shirt on and tie the 2 ends in a knot. Tadaaa - a cute tie-in-the-front shirt!
So there you have it - 3 super fun DIY shirts you can make using an old t-shirt! Please comment below if you have any trouble making any shirt or if you have any tips or suggestions.
Enjoy! :)
No comments:
Post a Comment